
Showing posts with label Characters. Show all posts
Showing posts with label Characters. Show all posts
Sunday, 9 April 2017
Wednesday, 22 March 2017
Creepy Clown: Start of some ideas
Having not done very much makeup recently, I decided to go into this look without a set plan which is always a mistake I find. However there are a couple of interesting parts to it which I may develop.


The main problem is adding too many elements which fight against each other and it creates a confusing final result. But it's still kinda creepy.


Sunday, 30 October 2016
Slit Throat
This one was quite quick, involving building a few layers of liquid latex, pouring a thicker line in the middle and resting a greased up crochet needle in the middle. Then I bulked it up with dried pieces of latex from a previous failed attempt and sealed with a few more layers. I didn't want to use tissue or cotton as I think it's harder to paint to look like skin. Note to self: applied to perspex dish which is lightly greased with vaseline and latex peels off a treat, just need to apply talc as you go to stop it sticking.
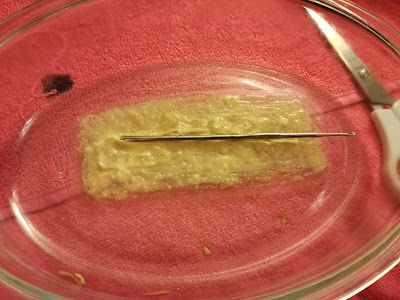


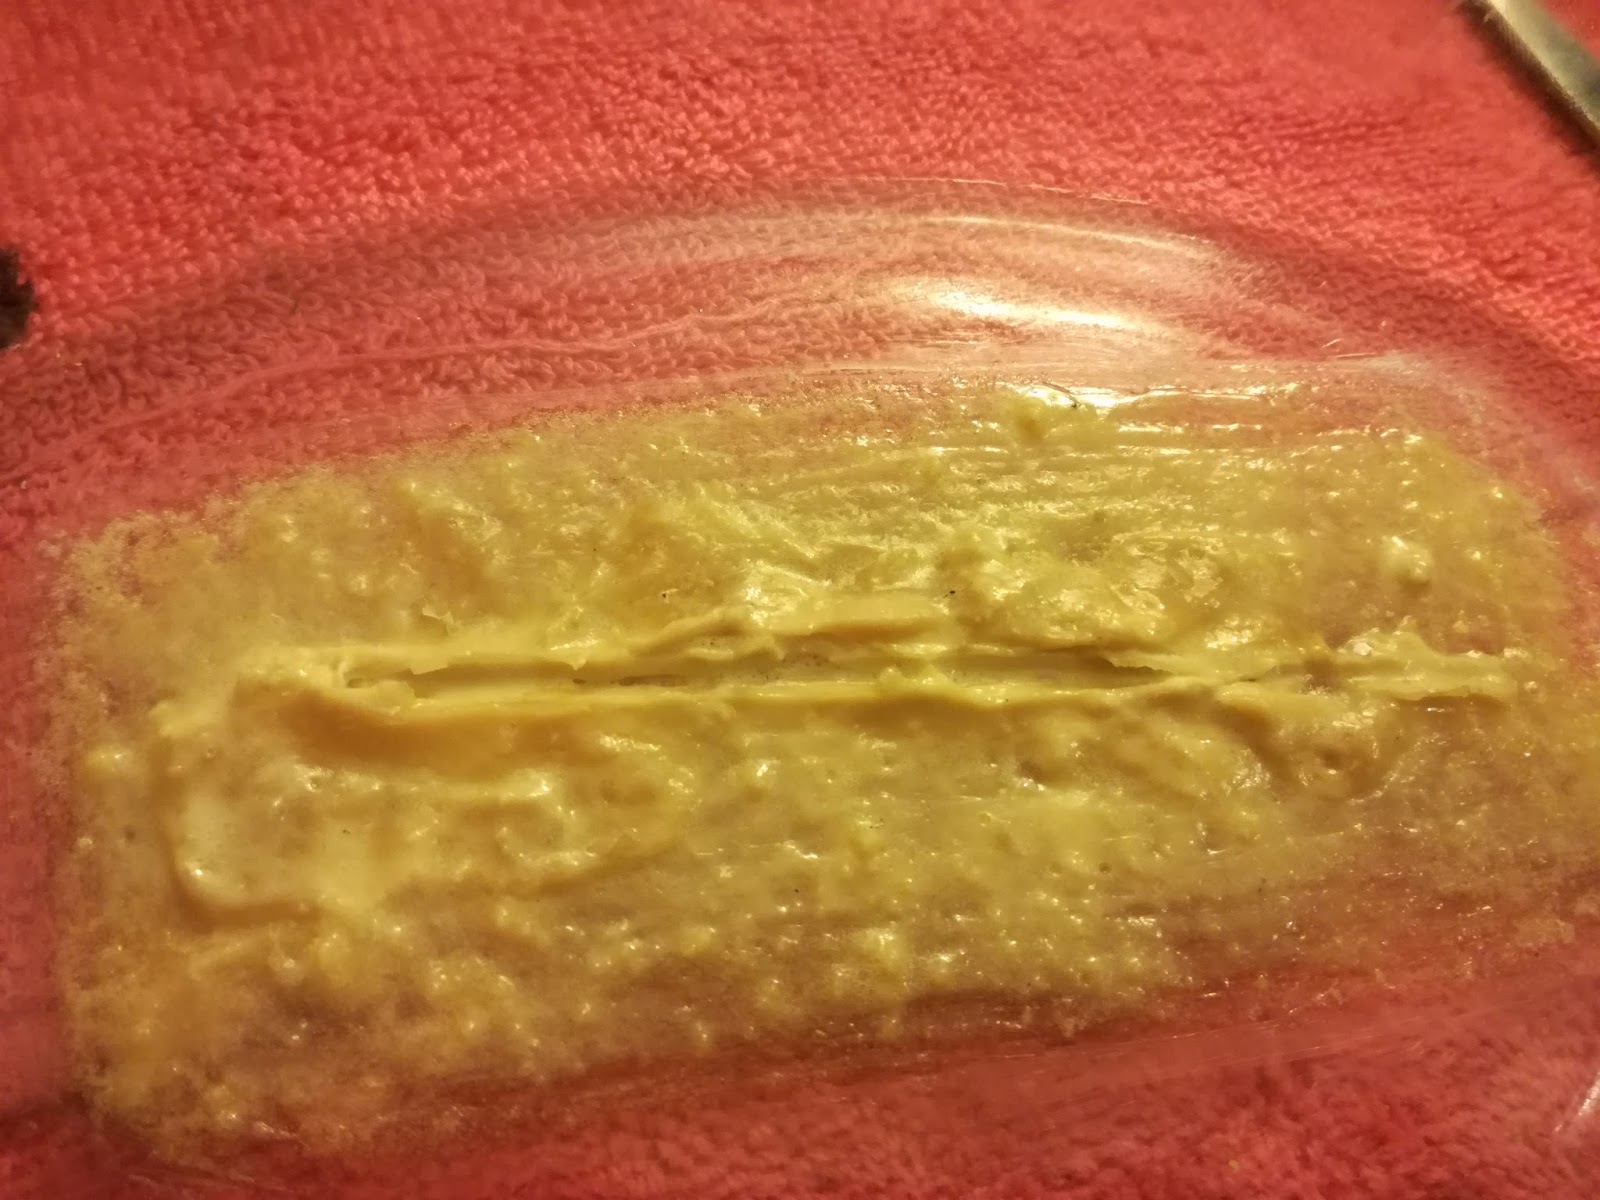


Fake blood went a bit overboard but the overall effect was quite funny.


Happy Halloween!
Wednesday, 5 October 2016


Friday, 1 July 2016
Drag King
This look was tricky. I went in too heavy with the makeup to start with and then covered up with fake stubble (using disposable mascara wand).


Saturday, 31 October 2015
Old Man Experimental Makeup
I had another crack at aging makeup using a few different techniques in the one look.
Things that didn't work:
Latex-coated layers of tissue (This was too lumpy and a difficult texture to work with).
Scar wax (although I did set it with powder and then a layer of latex, it still was too melty. Also hard to apply as contact with skin melts it easily).
Things that did work:
Adding a layer of latex to cheek, stretching skin while it dries (used a hairdryer on cool setting) then when you let go it creates a wrinkled effect. Worked best after a few layers.
Adding blue veins around temples.

As you can see below it's quite a crusty look due to the tissue, I liked the wrinkle effect on the cheeks though.


Friday, 3 July 2015
Elsa Rhae inspired monster
This was partly inspired by the wrestler Fergal Devitt/Prince Devitt/Finn Balor, but the main inspiration was Youtube blogger Elsa Rhae, a talented makeup artist/illusionist. I watched her arachnophobia tutorial and then got to it! Was hard not to just copy what she did as hers is so good - I could add more of my style in time. Check out her stuff at www.youtube.com/user/ElsaRhae


Sunday, 19 April 2015
Skeleton


For this look I used face paint, eye shadow with water, grease paint and powder. It looked better once I went over the black grease paint with greys and browns to soften it up and make it look aged. This is partly inspired by the makeup from TV series American Horror Story, but I really just ad-libbed from my memory of drawing skulls in art lessons back in school.
Thanks again to Deebs for modelling for me.
Sunday, 28 December 2014
Nanageddon
For anyone familiar with the British comedy program "The Mighty Boosh", or anyone that has the Mighty Book of Boosh (which came after the series), this make up is inspired by "Nanageddon" an episode of the Mighty Boosh and also a character which is depicted in the book. She is a demon granny who, when summoned, tries to gather other elderly ladies to take over the world. Sketch below can be found in the Mighty Book of Boosh: http://www.amazon.co.uk/Mighty-Book-Boosh-Julian-Barratt/dp/1847673228


.jpg)

The book is written and illustrated by Julien Barratt, Noel Fielding and Dave Brown.
What specifically drew me to the drawing was the mask-like face and the jumbling together of different colours. The mighty boosh has always been a favourite TV program of mine due to its fantastical costumes and makeup, and also its surreal humour.
Painting my eyelids was tricky so the white pupils were more of a smudge.
Because it's so fantastical and painterly I used my fingers as well as brushes, and also an array of materials such as grease paint, kohl and liquid liners and eye shadows.
Friday, 12 September 2014
Drag Quain
Following on from my last post, I decided to once more subject Deebs to my make up experimentation. I also bought prittstick which worked well on the eyebrows, although you do have to be careful that it doesn't clump and that you wait for it to dry properly between coats.
I decided to us his fair skin to create a similarly gothic look to the previous post. I also used the stencil technique to help contour the cheekbones and temples.
The most challenging parts were hiding the stubble/sideburns and softening the face.


As you can see, the sideburns are prominent. However I wanted to show the stenciling of the darker contour colours. Basically I used the edge of a piece of paper across the temples and cheekbones then applied layers of darker colours and blush, creating a defined edge.

I decided to us his fair skin to create a similarly gothic look to the previous post. I also used the stencil technique to help contour the cheekbones and temples.
The most challenging parts were hiding the stubble/sideburns and softening the face.
This all stems from watching a lot of RuPaul's Drag Race, and I thank Deebs for allowing me to do these things to him.
Saturday, 19 July 2014
Fish lady; latex-tures
Having failed to master a successful latex application, I decided it was time to experiment using a variety of materials in order to find what works best for me.
In truth I didn't have a set plan except trying out materials so what was initially going to just be a "tired baggy eye" look, turned into some sort of sea monster. But I just went with it anyway.
Materials from top to bottom:
- newsprint paper - hard to add bulk without ridges showing
- embroidery thread - could be useful for veins/ detail
- cotton wool - hard to work with, impossible to get smooth or to apply makeup to after
- more embroidery thread

- upholstery sponge - very promising, I just need to figure out how to seal off holes properly (spirit gum?)
- crepe paper - texture ok, hard to stick down properly, and very fragile/tears easily
- thick acrylic wool - not a bad material, although texture is quite specific
- bubble wrap - hard to disguise edges but a fun texture to work with

I always underestimate the pain of peeling latex off after it's stuck to your hair. I saw a tutorial online which suggested to coat the underlying hairs with spirit gum, and then scar wax once dry. Will try that next time.
Now for the sea lady look. The textures reminded me of some sort of sea creature so I just went along with it, even though it's usually better for me to have a plan first.

Brought to my mind a very fishy episode in the series Mighty Boosh called "old gregg" .
Note to self: sponge is great to work with, especially as you can mould it when the latex becomes tacky. The idea came to me after watching a Rick Baker tutorial where he used sheets of poly foam, which I imagined to have spongy qualities.
Monday, 26 May 2014
Barber
My third participant, Emma, kindly offered to help me practice another look using latex. At first I had plans for her to be Mediterranean-looking strongman, but this turned into an old fashioned barber with the use of a few costume props.
Emma (woman)

Emma (man)

The latex chin and jaw was made very quickly using cotton wool. I think it would have been better with some putty and a bit of latex on the top to hold it in place. It came out looking pretty crusty - even being able to make it in advance would have been better I think. I would love to work with gelatine prosthetics as they can just melt into the skin and blend in more easily.

I stuck on the moustache and sideburns with spirit gum and used a fairly dark foundation to cover the face and prosthetics. I also thickened the eyebrows a little and gelled her hair down.


Pictures below show a stripped back version with a smaller moustache, then just without the fake jaw.


Thanks again to Emma for her help!
Subscribe to:
Posts (Atom)